NextAuth with Django REST Framework
This blog will outline and explain the steps for accomplishing:
- SSO for NextJS frontend using NextAuth
- Authenticated and Authorized endpoints in DRF using Token Authentication
TLDR: The trick is to use the SignIn callback to send the idToken from SSO provider to the DRF backend, and have the DRF backend validate the token then create a token (or new account and token) that can be used to authenticate future requests to the DRF endpoints.
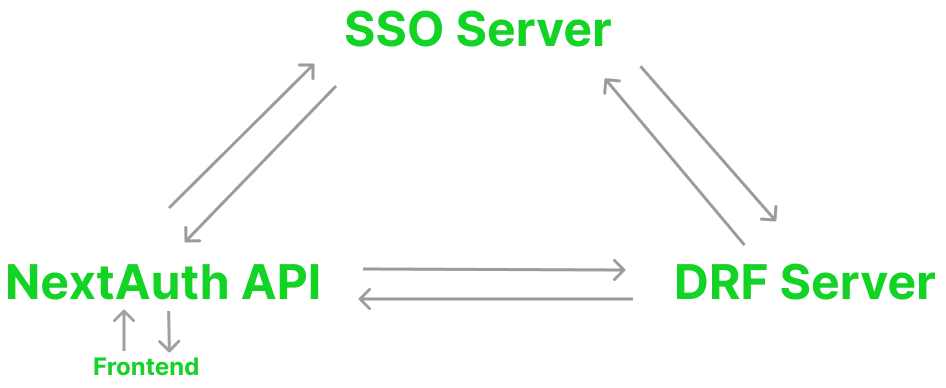
Request Response CycleLink to the Request Response Cycle section of this page
- Frontend will send a reques to NextAuth Login API.
- NextAuth Login API will request a token from the SSO Server. This is the first step in Authentication.
- NextAuth API will send that token to DRF Server.
- DRF Server will validate that token with SSO Server. This is the second step in Authentication, basically verification of authentication.
- DRF Server will either create a new account and token for that user or regenerate the token of that user and send it back to NextAuth API - any other information from the user can also be sent back and included in the resulting login session at this time.
- NextAuth will create a session which persists in the clients browser via a cookie (which cannot be accessed by javascript running in browser).
- useSession hook will be availble throughout the NextJS project to allow access to session information. This session will contain the Authentication Token which will be used to Authenticate the user when they make requests to the backend.
SSO Set upLink to the SSO Set up section of this page
In this example Google OAuth2 will be used, but any service that provides social sign on will work the same.
First acquire a client ID and secret from the provider, then configure the allowed origins and callback URLs with the SSO provider.
NextAuthLink to the NextAuth section of this page
Our NextJS project needs to create a NextAuth API which is as simple as creating a pages/api/auth/[...nextauth].js file with the following source code:
NextAuth codeLink to the NextAuth code section of this page
import NextAuth from "next-auth";import GoogleProvider from "next-auth/providers/google";
export default NextAuth({  providers: [    GoogleProvider({      clientId: process.env.NEXT_PUBLIC_OAUTH_CLIENT,      clientSecret: process.env.NEXT_PUBLIC_OAUTH_SECRET,    }),  ],  secret: process.env.NEXTAUTH_SECRET,  session: {    maxAge: 24 * 60 * 60,  },  callbacks: {    async signIn({ user, account }) {      if (user) {        const idToken = account.id_token;        try {          await fetch(`${process.env.NEXT_PUBLIC_LOGIN_URL}`, {            method: "post",            headers: { "Content-Type": "application/json" },            body: JSON.stringify({              auth_token: idToken,            }),          })            .then((response) => response.json())            .then((data) => (user.auth_token = data));          return true;        } catch (error) {          return false;        }      }    },    async jwt({ token, user }) {      if (user) {        const { auth_token } = user;        token.auth_token = auth_token;      }      return token;    },
    async session({ session, token }) {      if (token.auth_token) {        session.auth_token = token.auth_token;        return session;      }    },  },});
NextAuth code explainedLink to the NextAuth code explained section of this page
NextAuth has builtin providers for all SSO providers, here we are using the GoogleProvider.
This code starts off by setting the secret from an environmental variable, then the session settings are configured.
maxAge determines how long the session will be valid, which means how long until the user will need to sign in again.
Callback functionsLink to the Callback functions section of this page
The signIn callback is invoked when the user is authenticated by the SSO provider.
In this configuration the signIn callback will make a POST request to the DRF server. The body of the POST request will be our idToken (which is received from the SSO provider).
The jwt callback is invoked when the the signIn callback returns true.
This is where we can define what information will be stored in the JWT, which is stored in the Session Cookie. In this configuration we include the auth_token that is sent by the DRF Server which will later be used as an API key to make authenticated requests to the DRF server.
The session callback is invoked after the jwt callback signs and encrypts the jwt
This is when auth_token gets added into the session object. After the session callback completes the session is created and the user is returned to the frontend.
Making calls to the protected DRF endpointsLink to the Making calls to the protected DRF endpoints section of this page
import { useSession } from "next-auth/react";const { data: session } = useSession();These two lines of code give the frontend access to the auth_token that we need to use to communicate with the DRF server.
Any other data that you have added into the session (e.g. data from the idToken or sent from the DRF server) can also be accessed like this.
When making requests to the protected DRF endpoints use this header:
headers: { Authorization: "Token " + auth_token, "Content-Type": "application/json",}DRFLink to the DRF section of this page
Our endpoints will be protected by Token Authorization. The step up consists of adjusting the user model and creating 4 new files.
DRF CodeLink to the DRF Code section of this page
- The accounts model should have an Auth Provider attribute in case multiple providers are used
auth_provider = models.CharField(max_length=50)
views.pyshould have a SocialAuthView that does not require authorization
@permission_classes((AllowAny, ))class GoogleSocialAuthView(GenericAPIView):
    serializer_class = GoogleSocialAuthSerializer
def post(self, request): """ POST with "auth_token" Send an idtoken as from google to get user information """ serializer = self.serializer_class(data=request.data) serializer.is_valid(raise_exception=True) data = ((serializer.validated_data)['auth_token']) return Response(data, status=status.HTTP_200_OK)serializers.pyshould have a SocialAuthSerializer that is used to validate theidTokenthat the NextAuth API sends
class GoogleSocialAuthSerializer(serializers.Serializer):    auth_token = serializers.CharField()
    def validate_auth_token(self, auth_token):        user_data = google.Google.validate(auth_token)        try:            user_data['sub']        except:            raise serializers.ValidationError(                'The token is invalid or expired. Please login again.'            )        if user_data['aud'] != settings.GOOGLE_CLIENT_ID:
            raise AuthenticationFailed('oops, who are you?')
        email = user_data['email']        name = user_data['name']        provider = 'google'
return register_social_user( provider=provider, email=email, name=name)- This serializer will take import from the next file we need to create
google.py
from google.auth.transport import requestsfrom google.oauth2 import id_token
class Google:
    @staticmethod    def validate(auth_token):        try:            idinfo = id_token.verify_oauth2_token(                auth_token, requests.Request())
            if 'accounts.google.com' in idinfo['iss']:                return idinfo
except: return "The token is either invalid or has expired"- Next we need to create
register.py
from rest_framework.authtoken.models import Tokenfrom default_locations.models import DefaultLocationfrom accounts.models import Userfrom django.conf import settingsfrom rest_framework.exceptions import AuthenticationFailedfrom django.core.exceptions import ObjectDoesNotExist

def register_social_user(provider, email, name):    filtered_user_by_email = User.objects.filter(username=email)    if filtered_user_by_email.exists():        if provider == filtered_user_by_email[0].auth_provider:            registered_user = User.objects.get(username=email)            registered_user.check_password(settings.SOCIAL_SECRET)            Token.objects.filter(user=registered_user).delete()            Token.objects.create(user=registered_user)            new_token = list(Token.objects.filter(                user_id=registered_user).values("key"))            return {                'user_id': registered_user.id,                'tokens': str(new_token[0]['key'])}        else:            raise AuthenticationFailed(                detail='Login using ' + filtered_user_by_email[0].auth_provider)    else:        user = {            'username': email,            'password': settings.SOCIAL_SECRET        }        user = User.objects.create_user(**user)        user.is_active = True        user.auth_provider = provider        user.save()        new_user = User.objects.get(username=email)        new_user.check_password(settings.SOCIAL_SECRET)        Token.objects.create(user=new_user)        new_token = list(Token.objects.filter(user_id=new_user).values("key"))        return {            'user_id': new_user.id,            'tokens': str(new_token[0]['key']),        }
DRF Code ExplainedLink to the DRF Code Explained section of this page
The user model needs to keep track of the auth_provider so that multiple SSO providers can be implemented
- This allows for Sign in with Google, Sign in with Facebook, Sign in with Github, etc…
Creating a view for each SSO creates an endpoint that NextAuth will request during the
signIncallbackCreating a serializer for each endpoint allows for the
idTokensent by that endpoint to be validated- This is where one would make a query for other data in the DRF’s database that they might send back to be included in the frontend’s session data
Creating
google.pyas a seperate file is not strictly necessary but this allows for more readable code in my opinion- this function is what actually contacts the SSO provider and validates the token
register.pyis where the users and tokens are generated- if the user already exists their existing token is deleted and a new one is created for them
- if the user does not exist a token and a new user is created
The DRF server needs to expose an unauthorized endpoint that accepts an idToken, validate that token with the provider and if the token is valid it needs to create an Authorization Token, and a new user if that idToken has not already been used by an existing account.
Requiring Authorization for other DRF endpointsLink to the Requiring Authorization for other DRF endpoints section of this page
Add
permission_classes = (IsAuthenticated,)with therest_framework.permissions import IsAuthenticatedfunction to all endpoints- it is possible to set permission classes with decorators as well
@permission_classes( [IsAuthenticated], )- DRF permissions docs
Place these settings in the
settings.pyfile of the main portion of the Django project
AUTH_USER_MODEL = "accounts.User"REST_FRAMEWORK = { 'DEFAULT_AUTHENTICATION_CLASSES': [ 'rest_framework.authentication.TokenAuthentication', ],}- This is all that is required for the endpoints to refuse access when in invalid token is not sent to them and accept when a valid token is sent
- The endpoints will now have
self.request.useravailble to them
ResourcesLink to the Resources section of this page
- Project I used this code for
- Token Authentication
- NextAuth Docs
- GitHub Discussion about NextAuth and DRF
- Article by Mahieyin Rahmun and its second part
- Article by Episyche used for
register.py,google.pyandserializers.py